Friday, October 28, 2011

Flat bottom table saw cuts

If you've spent much time watching New Yankee Workshop, you've seen Norm cut a wide dado (slot) in a piece of wood by making multiple passes with the table saw, moving the wood a little to the side after each pass.

But when I tried it, I found that my saw left a V-shaped profile at the bottom of the cut, like the one on the left here:

That's because my blade, like most table saw blades, has an Alternating Top Bevel (ATB) grind.  You can see a good picture at the bottom of Rockler's blade selection page.  If you look carefully at a blade edge-on in the store, you can generally see the alternating profile, like you see on that page.

What I needed was a blade with a flat top grind.  Apparently there are blades where all the teeth have a flat (or "raker") grind, but I've only ever seen them on Dado sets.  (Ripping blades supposedly are ground this way, but I've never seen one that actually was.)

So instead of having all flat top grinds, I wanted an ATB/R (Alternating Top Bevel with Raker) blade.  The rockler page calls this a "combination" grind.  Remarkably, only two of the 10" blades they sell have this grind.

I ended up buying two blades: the Dewalt 7150PT ($36.04) and the Freud LU84R011 ($69.99).  Both are 50 tooth "combination" blades, designed to be good at both ripping and crosscutting.

The Dewalt blade also happens to be a "thin kerf" blade -- it makes cuts that are 0.100" wide, compared to the 0.125" kerf of the Freud.

Once the blades arrived, I took some test cuts in a piece of 3/4" MDF to see how they compared to my original 80-tooth Diablo ATB blade.  (Huh, turns out that's also a 0.100" thin-kerf blade.  I never noticed before!)

I cut both single-pass and multi-pass slots:

Here you can see the profiles left by the blades in single-pass cuts:

The cut on the right is my ATB Diablo blade.  It leaves the deepest V-groove.  Measuring the groove in the wood with my calipers, it looks like the bottom of the groove is about 0.016" deeper than the top.

The cut on the left is the Dewalt ATB/R blade.  Disappointingly, it also leaves a pretty significant V-profile, about 0.009".

The wider middle groove is from the Freud.  It's the flattest, but still not perfect; I see about 0.005" difference between the top and bottom.

On to the multi-pass cuts.  I should have been more careful to control the amount I moved between each pass, but the results agree pretty well with the single-pass tests.

The photo at the top of the page shows the Diablo ATB results.  Here's the slot left by the Dewalt:

And here's the slot left by the Freud:

Conclusion: I'm not particularly satisfied with the dadoes from the Dewalt blade.  The main reason I considered replacing my existing blade was to get flat bottomed channels, and the slots it leaves are bumpy enough that I'd still want to clean them out by hand with a chisel.  On the other hand, it's half the price of the Freud, and cuts just as easily.

The Freud blade is the one I'll keep on my saw (there's another table saw at work I'll use with the Dewalt).  I was hoping for completely flat slots, but these are good enough for my needs.

Tuesday, October 04, 2011

linux-alsa-driver-modules not up to date

To get HDMI audio working on my lucid machine, I added some PPAs and then did:

$ sudo apt-get install linux-alsa-driver-modules-$(uname -r)

That fails currently, since the PPA hasn't kept up to date with the most recent kernel:

E: Couldn't find package linux-alsa-driver-modules-2.6.32-34-generic-pae

So for now, I've just downgraded to the old kernel.  I also removed linux-image-generic so that it wouldn't automatically upgrade my kernels in the future:

$ sudo apt-get remove linux-image-generic-pae

$ sudo apt-get remove linux-image-2.6.32-34-generic-pae

Update (31 Jan 2012): Good grief, and now it's broken again.  The latest kernel is 2.6.32-38.  The fix this time was to add the lucid-proposed repository and install linux-backports-modules-alsa-lucid-generic-pae. That installs linux-backports-modules-alsa-2.6.32-38-generic-pae, which seems to take the place of linux-alsa-driver-modules-2.6.32-38-generic-pae.

To add lucid-proposed in synaptic, it's Settings... Software Sources... Updates... Pre-released updates.

That adds this line to the /etc/apt/sources.list:

deb http://us.archive.ubuntu.com/ubuntu/ lucid-proposed restricted main multiverse universe

Wednesday, September 28, 2011

Viewing Step (STP) files in Linux

Mechanical engineers use step files to send their designs out for manufacturing.  FreeCAD is Free Software that will view them. So tonight all I had to do on my Ubuntu Lucid machine was "sudo apt-get install freecad", then run it.  It opened up the smaller step files in the liquid galaxy mechanical drawings just fine, although it did hang for quite a while when I tried the bigger ones (and I wasn't patient enough to see if it'd eventually figure it out).

Monday, September 12, 2011

The chasm between photo and video


One of the reasons the web became so popular is that it made it easy to put photos and text together.


Now we're straining at the limits of static photos.  We want them to be more lifelike, not just paintings on a wall.  The sway of trees, our wandering gaze, the way we bob and turn our heads to get the shape of a thing.  We get none of that with a static image.

Sure, it's getting a lot easier to embed video.  But videos are like movies: they demand our whole attention from start to finish, and then they're done.  Videos are entertainment, distractions.  I'm talking about ambiance, digitized memories.

Here's what I see happening at the edges of what an image is.

Cinemagraphs are just animated GIFs, adding a tiny amount of motion to a scene to give it life.  Cinematograph gallery, another one

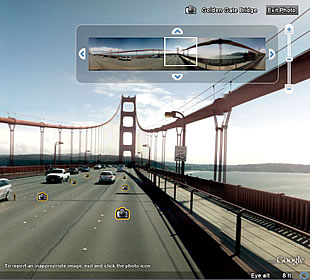
Google Street View was one of the earlier players, showing panoramic photos on a map.  Here's "indoor street view" from the Iraq Museum


Lytro has an after-the-fact refocusable lightfield camera.  They call their photos "living pictures".  Lytro gallery


Several news outlets have been playing with before/after photos of natural disasters.  Click-to-toggle before/after / Slide before/after


"360 views" for products are gradually spreading through the online marketplace.  Click "360 view" to see an example here: http://www.ford.com/cars/focus/?intcmp=fv-hpbb-dflt-40mpg-focus


A sackful of kludges


Except for the GIFs, every one of these innovative trends has something in common: somebody had to write code to make them work.  Street View and Lytro, and many of the 360-degree product viewers require Flash.  The before/after photos seem to have been one-off projects by the news outlets.

That's why the images I linked to are just static pictures -- only the .gif actually "works" without clicking on the links.  (And the .GIFs themselves are also a huge kludge -- it's an ancient image format that only supports 256 colors, and has been a headache for browser vendors for years).


So none of them are really embeddable; you can't easily save a local copy of them, email them to your friends, or put them into a slide presentation.  You can link to the pages where they live, but you're out of luck if the owners ever take the pages down.

Even ordinary product photos suffer from this kludge problem.  How many times have you clicked on a product photo to "view bigger", only to get a popup window with the same image, at the same resolution?  Some sites use flash, some use popups, some use javascript abominations that obliterate the product's description with a zoomed in image any time your cursor drifts across the product thumbnail.

What does it all mean?

The experimentation is good.  People are exploring, seeing what catches on.  There's a lot of space in the spectrum between static photos and video, and we're not done exploring it yet.

We don't even have good names yet.  "360 view" is starting to catch on for drag-to-swivel product photos, but there doesn't seem to be any standard way to talk about the before-and-after photos, or any mental framework that lets us explain how they relate to 360 views or cinemagraphs.

And we need tools.  Lots of creative people don't have the programming skills needed to build prototypes like these.  And viewers get old and rickety quickly -- flash was the only way to do this stuff a few years ago, but everything you see here could be done just as well in html5.

My humble contribution to the space is the swivel viewer, which actually could be coerced to work for most of the things I described here.  It proceeds from the notion that a set of images is better than a single one; drag your mouse to flip between images, scroll to zoom.  But it's not embeddable, awkward for cinemagraphs and useless for panoramas.

Eventually we're going to need file formats that bundle these things -- whatever you call them -- into a single file, browsers that can embed them, and editors that let us create and tweak them.

I have no idea what that's going to look like, but whoever creates it is going to enable the expression of a lot of pent-up creativity.

Friday, August 26, 2011

Android ProgressDialog reappears and won't go away

You'd think it'd be easy to create a progress dialog in your android app, but as far as I can tell, it's completely broken.  Any number of things will cause it to reappear or never go away.  Here's an apparently-ignored bug report:
http://code.google.com/p/android/issues/detail?id=11953

Tuesday, August 16, 2011

GWS S125 1T servo

Acroname sells the "R298-1T-SERVO", which is actually a GWS S125 1T/2BB.  It's different from most servos in that you can tell it to set any angle from 0-360 degrees, whereas most ordinary servos only move 90-180 degrees.

It has a 25-tooth spline, which should make it compatible with futaba arms.

Pololu sells it under the correct part number.

Tuesday, August 09, 2011

Arduino pro mini + bluesmirf + FTDI basic


Tonight I got my Ubuntu Lucid machine to program a 3.3v Arduino Pro Mini using a 3.3v FTDI Basic USB->TTL serial interface, and then got them both to talk to a BlueSmirf bluetooth->TTL serial board.

To get the bluetooth board to work, I wired it to the USB board so that I could talk to it from both ends: its serial lines and over bluetooth.  (See photo)


I ran minicom and connected to /dev/ttyUSB0, talking to the USB board and thus to the serial lines on the bluesmirf.  This bluesmirf was set up to communicate at 57600 baud, which I had to find by trial and error.  Once I got the right baud rate, typing "$$$" got me a "CMD" prompt as the manual suggests.  I switched it over, so now it uses 115200 baud.

On the bluetooth side, I used these instructions to talk to the bluesmirf over bluetooth from my glaptop:


Once I ran this: sudo rfcomm connect 0 00:06:66:04:B1:C2 1

I thought it was going to let me type to the bluetooth device, but really it's just creating /dev/rfcomm0 and then doing nothing. So with that command running in another window, I ran minicom and pointed it at /dev/rfcomm0, at which point I was able to type and see it in the other minicom window (pointed at /dev/ttyUSB0), and vice versa.

So that's how I knew the bluesmirf board was working.

To get the arduino running on my lucid machine, I had to apt-get install gcc-avr and avr-libc, make sure my JAVA_HOME was set right (because I have sun-java6-jre installed): export JAVA_HOME=/usr/lib/jvm/java-6-sun/jre

Then I downloaded the 64-bit linux install from here: http://arduino.cc/en/Main/Software and unpacked it into a folder in my home directory.  Then I cd'ed into it and ran ./arduino.  I tried the http://arduino.cc/en/Tutorial/Blink example, and it worked great.

Next, I wired the arduino to the bluesmirf as shown here:


I left the bluesmirf TX unconnected to the arduino RX so that it wouldn't interfere when I programmed the arduino.  I used the "arduino" IDE to compile the following program, which just dumps some stuff over the serial port any time the reset button is hit.  The only change from the stock arduino "ASCII table" example is the change to 115200 baud, and pulling pin 13 high to assert the CTS hardware flow control line on the bluesmirf.  (I could also just as easily have run a wire from VCC to that line):

/*
  ASCII table
 
 Prints out byte values in all possible formats:  
 * as raw binary values
 * as ASCII-encoded decimal, hex, octal, and binary values
 
 For more on ASCII, see http://www.asciitable.com and http://en.wikipedia.org/wiki/ASCII
 
 The circuit:  No external hardware needed.
 
 created 2006
 by Nicholas Zambetti 
 modified 18 Jan 2009
 by Tom Igoe
 
 This example code is in the public domain.


 */
void setup() 
{ 
  Serial.begin(115200); 
  pinMode(13, OUTPUT);
  digitalWrite(13, HIGH);
  
  // prints title with ending line break 
  Serial.println("ASCII Table ~ Character Map"); 
} 

// first visible ASCIIcharacter '!' is number 33:
int thisByte = 33; 
// you can also write ASCII characters in single quotes.
// for example. '!' is the same as 33, so you could also use this:
//int thisByte = '!';  

void loop() 
{ 
  // prints value unaltered, i.e. the raw binary version of the 
  // byte. The serial monitor interprets all bytes as 
  // ASCII, so 33, the first number,  will show up as '!' 
  Serial.write(thisByte);    

  Serial.print(", dec: "); 
  // prints value as string as an ASCII-encoded decimal (base 10).
  // Decimal is the  default format for Serial.print() and Serial.println(),
  // so no modifier is needed:
  Serial.print(thisByte);      
  // But you can declare the modifier for decimal if you want to.
  //this also works if you uncomment it:

  // Serial.print(thisByte, DEC);  


  Serial.print(", hex: "); 
  // prints value as string in hexadecimal (base 16):
  Serial.print(thisByte, HEX);     

  Serial.print(", oct: "); 
  // prints value as string in octal (base 8);
  Serial.print(thisByte, OCT);     

  Serial.print(", bin: "); 
  // prints value as string in binary (base 2) 
  // also prints ending line break:
  Serial.println(thisByte, BIN);   

  // if printed last visible character '~' or 126, stop: 
  if(thisByte == 126) {     // you could also use if (thisByte == '~') {
    // This loop loops forever and does nothing
    while(true) { 
      continue; 
    } 
  } 
  // go on to the next character
  thisByte++;  
}


Once I flashed the arduino, I connected from my laptop to the bluesmirf over bluetooth, hit the reset button, and saw the table as expected in the minicom window connected to /dev/rfcomm0.  First try, even. :)